Introduction
HubSpot forms are indispensable tools for efficiently gathering user information on websites and realizing effective marketing activities. By utilizing HubSpot forms, you can convert visitors into prospective customers and achieve centralized management of customer data. This form creation tool features an intuitive drag-and-drop editor and a wealth of templates, allowing you to easily create and embed forms without any coding. Furthermore, because the basic functions of HubSpot forms are available even on the free plan, even first-time users can easily implement them. In this article, we will delve deep into everything from the basic functions of HubSpot forms to their diverse types, specific creation procedures, and even advanced utilization methods. Please grasp the full picture of HubSpot forms—from lead acquisition to improving customer satisfaction—to accelerate your business growth and assist your company's marketing strategy.
The form functionality of HubSpot plays an important role in promoting effective marketing by collecting user data from websites and facilitating activities such as resource downloads. When creating a HubSpot form, you can easily create and customize it through intuitive operations, even without special technical or design skills. Creation methods utilizing templates are also available, making it possible to create forms suited to your specific needs. For example, you can easily build forms tailored to your objectives, such as forms to be placed on landing pages aimed at lead acquisition, survey forms to gather customer opinions, or resource request forms. Additionally, they are optimized for display on all devices through responsive design, contributing to an improved user experience. In this report, we will explain the major functions of HubSpot forms and their practical utilization methods in detail.
Two Types of HubSpot Forms
HubSpot forms primarily consist of the following two types. There are two types of HubSpot forms: embedded forms and standalone forms (standalone forms), each with different purposes and installation methods.
- Forms created within HubSpot
- Integration with forms created using tools other than HubSpot
First, the type generated within HubSpot is characterized by the ability to easily construct forms utilizing an intuitive drag-and-drop editor. Embedded forms can be placed directly within web pages, and standalone forms can be published as independent pages, making them easy to use for campaigns and specific marketing measures. This allows marketing personnel within a company to flexibly design forms suited to diverse purposes, such as customer inquiries and resource downloads. On the other hand, the integration function with forms created by external tools makes it possible to automatically import data sent from forms already in operation into HubSpot and manage it centrally.
HubSpot Forms: Differences Between Standalone Pages and Embedded Forms
When designing a form in HubSpot, the two primary methods are "standalone pages" and "embedded forms." An embedded form is a method of embedding a form into an existing website, and embedding a form (embedding the form) is extremely simple. In HubSpot, embedding is possible even without special technical knowledge simply by obtaining the embed code and pasting it into the HTML. On the other hand, a standalone page is a method of creating an independent page dedicated to the form on HubSpot. Correctly recognizing these two types is essential for effectively implementing the form that best matches your company's marketing goals.
Standalone Page (Case of copying a shared link)
One method of using HubSpot forms is the standalone page format. This is a method of constructing an independent web page dedicated to the form on the HubSpot platform. This page is given a unique URL automatically generated by HubSpot. This standalone page becomes the optimal choice when you want to design a completely independent landing page for a specific campaign or lead acquisition, or when you want to maximize HubSpot's advanced features to promote resource requests or webinar registrations.
Embedded Form (Case of embedding into HubSpot forms and external sites)
Another method of utilizing HubSpot forms is the embedded form. This refers to the method of seamlessly incorporating a form created on HubSpot into an existing website that is already being operated. HubSpot forms can be embedded into external sites, and when installing on an external site, it is necessary to embed HubSpot's tracking code into the external site beforehand. Also, embedding methods include using an embed code in WordPress or directly pasting the embed code in HTML. You can easily set up a form simply by generating the form's HTML code (embed code) and pasting that code into any location within your website. Even for sites using an external CMS (Content Management System) not hosted by HubSpot, it is possible to integrate HubSpot forms using this embedding function. Embedded forms are particularly effective in cases where you want to add a form in a natural shape to existing web content, or when you want to use HubSpot's powerful form functions while maintaining the design and brand consistency of the entire website.
How to Use Them Differently
It is important to select the standalone page or embedded form of the HubSpot form according to different purposes and situations. Please choose the format best suited to your business needs by referring to the following specific cases:
- If you want to build a dedicated landing page with a specific purpose from scratch → Standalone Page
- If you want to smoothly incorporate a form within an already existing website or blog article → Embedded Form
- If you want to fully utilize advanced HubSpot functions such as A/B testing and progressive profiling → Standalone Page
- If you want to blend it into the existing design or UI/UX of your company's website → Embedded Form
Benefits of Utilizing HubSpot Forms
Utilizing HubSpot's form functionality brings great benefits to a company's marketing strategy. Here, we will delve deeper into the major advantages provided by HubSpot forms. Furthermore, a major feature is that there are abundant functions to encourage user actions by utilizing HubSpot forms to automatically link with the CRM. Since data collected through forms is automatically integrated into the HubSpot CRM, information management is streamlined. In addition, HubSpot forms are realized using a mechanism that automatically saves created information in the HubSpot CRM and enables automatic data linkage with the CRM.
Can be created easily without coding
One of the greatest benefits of creating forms with HubSpot is that anyone can intuitively construct a form without programming skills. HubSpot's form creation tool adopts a visual drag-and-drop editor, and its feature is that you can easily create forms with intuitive operations even without expert knowledge. With simple drag-and-drop operations, you can freely add question items and set response formats (for example, dropdown menus or open-ended text), making it possible to create high-quality forms in a short time without special technical knowledge or design skills. This function allows marketing personnel to quickly stand up necessary forms even in situations where there is no engineer in charge of form coding within the company, or there is no time to request an external developer. As a result, it becomes possible to realize visually excellent forms while significantly saving resources such as time and cost.
Automatic data linkage with CRM is possible
Since data collected through forms is automatically integrated into the HubSpot CRM, manual data entry work becomes completely unnecessary. This smooths information sharing within the company and streamlines the initial actions for acquired leads. A feature is that you can proceed with a series of processes from lead acquisition to management of customer information without delay. Furthermore, it becomes possible to grasp the behavior history of form senders on the website in detail. For example, based on information such as "downloaded a specific white paper a few hours ago," it becomes possible to deploy more personalized communication tailored to that user's degree of interest.
Automatic actions after form submission can be set
Another major benefit of HubSpot forms is that you can set various automatic actions (workflows) according to various purposes after a form is sent. For example, when information is sent from a specific form, it becomes possible to automatically send a thank-you email or a follow-up email guiding the user to the next step. This dramatically speeds up customer response and contributes greatly to the promotion of lead nurturing and improvement of customer satisfaction. By automating such work, the burden of daily operations on the team is reduced, allowing them to focus on more strategic and creative work. It can be said that the charm is that automatic action workflows can be flexibly designed and customized according to each company's unique operational flow.
List of "items" for which automatic action workflows can be built with the form function:
- Send email
- Update contact property
- Add to list
- Execution of workflow
- Notification to sales representative
- Creation of task
- Trigger of custom event
- Notification to Slack
Can be embedded into external sites
One of the advantages of HubSpot forms is that created forms can be easily incorporated into external websites. After the creation of the form is completed, the installation is completed simply by pasting the automatically generated embed code into the relevant website or blog, and collected information can be managed centrally on the HubSpot CRM. This function allows for smooth embedding not only in sites built with HubSpot but also in external websites and blogs not hosted by HubSpot. Since the embed code corresponds to responsive design suited to the type of device, forms are always displayed optimally even when accessed from different devices, and forms can be installed without compromising the user experience.
Diverse Types of Forms and Their Characteristics
A variety of forms exist, but specifically, what types are there? We will delve deeper into the major form formats and their characteristics that can be constructed with the HubSpot form function.
Survey Form
A survey form is a form format frequently used for the purpose of collecting customer opinions, personal information (name, address, age, phone number, occupation, etc.), or evaluations of products and services. Google Forms is a representative tool. HubSpot forms can easily construct surveys incorporating choice-based or open-ended questions within HubSpot Marketing Hub. This makes it possible to efficiently execute customer satisfaction surveys and market research, and utilize the collected data for the improvement of products and services. Surveys created with HubSpot forms can be embedded in emails or landing pages, and designs for improving recovery rates and conditional branching logic can also be set. However, due to the characteristics of CRM, in cases where survey items fluctuate frequently or a wide variety of surveys are implemented, standard HubSpot forms alone may lack flexibility. In that case, it is desirable to consider linkage with timeline posts and suppress the increase of properties.
Inquiry Form
An inquiry form is an extremely common form format used when customers seek questions or support from a company. It is an indispensable element for a company's website and plays a role as the primary window for receiving inquiries from diverse customers. In HubSpot forms, a function is available to automatically distribute submitted inquiry content to the appropriate person in charge. Furthermore, settings for automatic reply emails after form submission can be easily performed, making it possible to construct a rapid response system for customers. However, please keep in mind that the function of inserting a confirmation screen before form submission, which is occasionally seen in Japan, is not provided as a standard function of HubSpot forms.
Email Form
An email form is a form with a function to send information entered by the user to the company side in an email format. This is similar to a general inquiry form, but it is used specifically for certain purposes, such as providing additional information after a resource download or encouraging registration for a specific campaign. By designing an email form with such a specific purpose using HubSpot forms, it is possible to effectively deepen engagement with customers.
Multi-step Form
What appeared in response to consumer needs is the "multi-step form." This format is a mechanism for inputting information through multiple stages rather than one long form, and it is attracting attention as an extremely effective tool that contributes to improving the conversion rate (CVR) of forms in many situations. Rather than showing all input items at once in a massive form, asking for information in stages reduces the mental burden on the user. This allows input work to proceed smoothly, suppresses the bounce rate where people give up on the form midway, and can be expected to have the effect of improving the final completion rate.
Typical usage scenes for multi-step forms are listed below:
- Consultation form for job seekers: When having applicants input their professional background, desired job type, work location, etc., in order.
- Estimate form for products/services: When the user selects specifications of products or services they are interested in in stages and the final approximate amount is presented.
- Large-scale survey: When you want to devise a way for respondents to continue answering until the end without getting bored in a survey survey with many question items.
By using HubSpot, the construction of such multi-step forms is easy. Furthermore, since user bounce rates at each input step and the final completion rate can be analyzed in detail, it becomes possible to improve forms based on user behavior data, and as a result, contributes to a significant improvement in the conversion rate.
Creation and Setting of Forms
When embarking on the new creation of a form within HubSpot, the first thing displayed is the screen to select the form's construction method. Here, you will choose between the latest form functionality and the legacy form functionality. Particularly, advanced functions such as multi-step forms are only installed in the new forms, so a careful choice is required depending on the type of form to be created.
Regarding Themes for New Forms
When starting the creation process with the new form functionality, you can select from the abundant form templates provided by HubSpot as standard. By utilizing these ready-made templates, it becomes possible to proceed with the form's design and layout settings extremely efficiently.
Addition and Selection of Fields (Properties)
When designing a form in HubSpot, you can freely add necessary input fields and perform detailed settings such as mandatory items and hidden items. Furthermore, it is also possible to flexibly customize action settings after form submission and the visual design. The main field types available in forms are as follows:
- Open-ended text field
- Multiple-choice dropdown menu
- Multiple-selection checkboxes
- Single-selection radio buttons
- Date input from a calendar
- Attachment file upload function
When adding new items to a form, category tabs such as "Fields," "Properties," and "Others" are provided in the HubSpot interface. Each of these tabs stores items with different characteristics, and you can select and utilize the most appropriate one according to the purpose of the form.
"Fields" tab focusing on field type selectionIn the creation of HubSpot forms, the "Fields" tab provides a process of first specifying the input format (e.g., radio button, dropdown list) and then associating an existing property or newly creating one. This approach is particularly useful when the specific property is undecided and you want to start consideration from what format you want to collect information in. However, in many form creations, since the properties to be collected are clear, the "Properties tab" described next tends to be generally utilized.
The main player in HubSpot form creation: "Properties Tab"The "Properties tab" is a function where you can quickly add to a form simply by directly selecting existing data items you want to include in the HubSpot form (for example, important contact properties such as name, company name, and email address) from a list and dragging and dropping them into the preview screen. Due to this intuitive and efficient operability, it becomes possible to quickly incorporate necessary information into the form, so it has become the most widely utilized approach in the item settings of HubSpot forms.
"Others" tab to improve form reliability and UXThe "Others" tab of HubSpot forms contains a wide range of functions to significantly improve the user experience (UX) and security of the entire form, although they differ from the input fields themselves. Here, it is possible to add easy-to-understand descriptive text at the top of the form or embed images to convey visual information. Furthermore, from the perspective of online security, it is possible to easily incorporate bot countermeasure functions by reCAPTCHA, which is extremely important, and data privacy consent settings to comply with regulations such as GDPR (for example, a checkbox asking for consent to the personal information protection policy). Particularly, the introduction of reCAPTCHA effectively prevents automatic submissions by malicious bots from contaminating the CRM database with unnecessary data, and establishes a state where only submissions from true leads are prioritized as targets for business activities.
Field (Property) Settings and Customization of HubSpot Forms
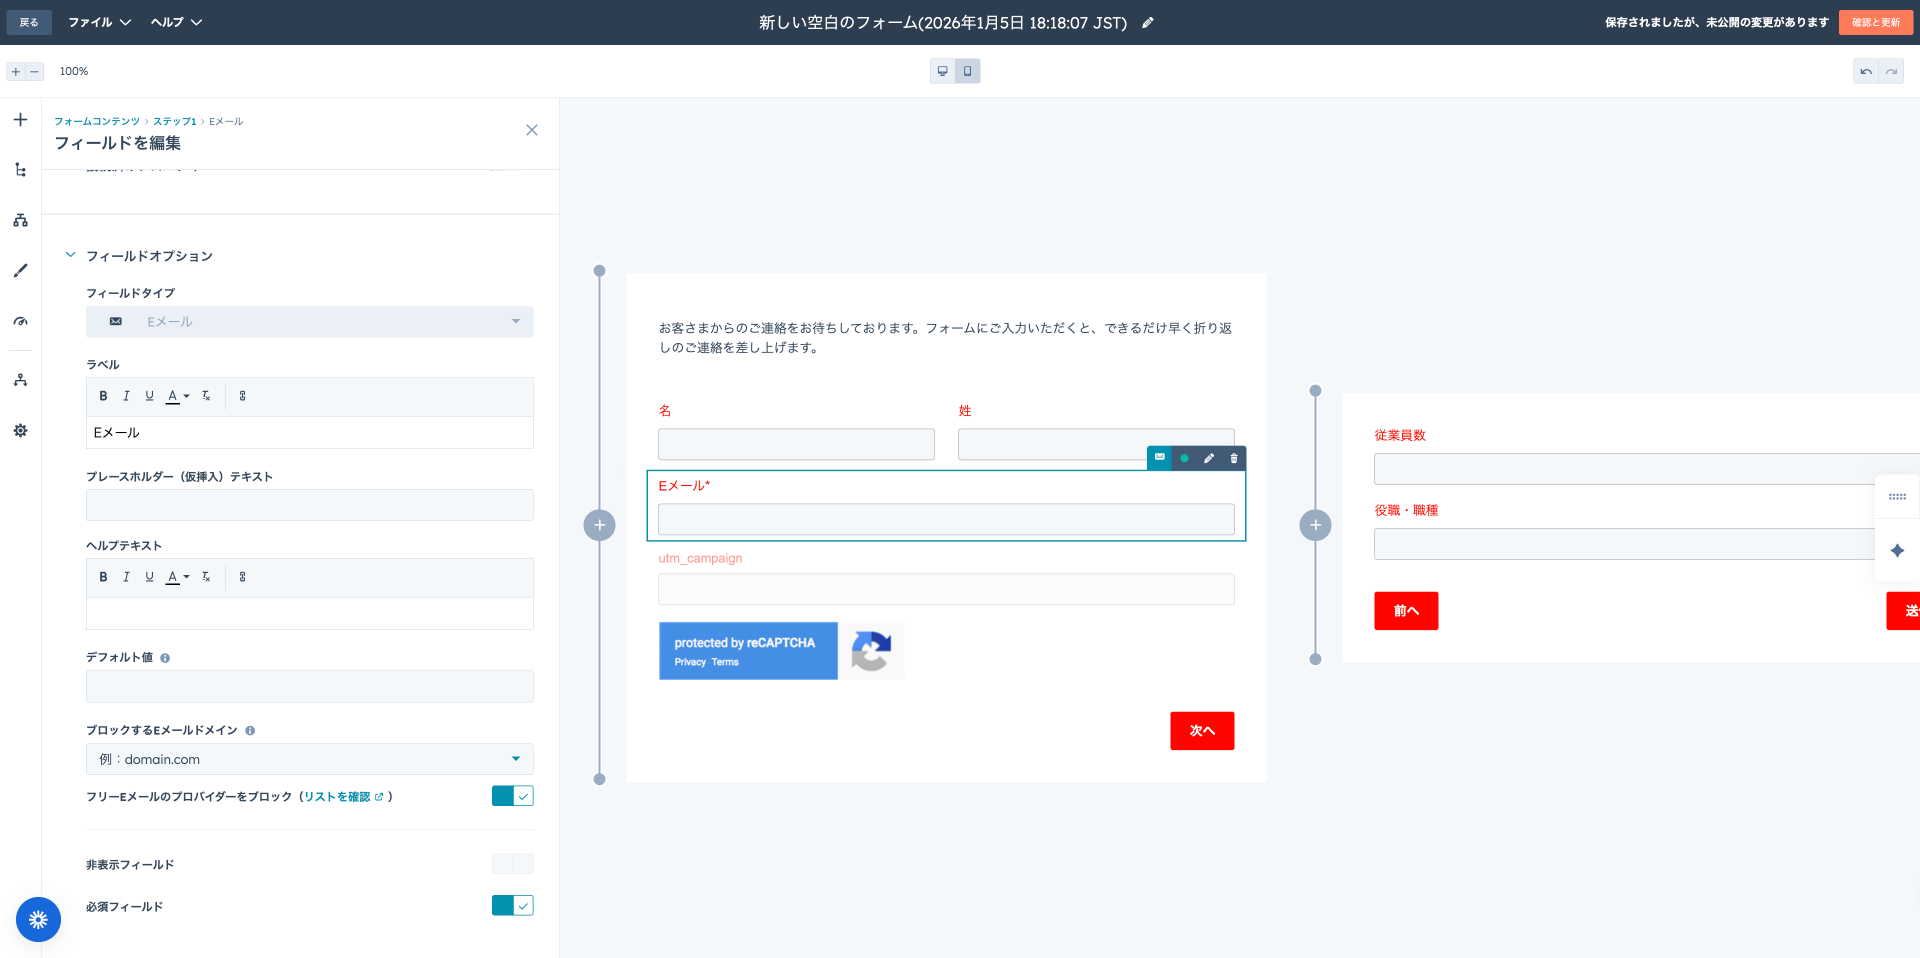
Details of each field (property) once added to a HubSpot form can be customized in detail in the "Field Options" section displayed on the left by selecting the relevant item in the right panel of the form editor screen. Here, various adjustments such as changing labels, setting placeholder text, and specifying mandatory items are possible. Also, if you want to edit the management name (internal name) of the form, you can easily change it just by clicking the pencil icon at the top of the screen, enhancing the convenience of management.
Labels and Supplementary Explanations Supporting Rich Text
Due to function enhancement in late May 2025, field labels (question sentences) and help text (supplementary information for users) of HubSpot forms have supported rich text editing. This has made it possible to emphasize text with bold, italics, or underlines, embed hyperlinks, or change colors. This function is extremely effective in improving the visibility of the form and conveying instructions and information to users more clearly. Also, regarding text related to data privacy, formatting except for changing colors has become available.
Management and Customization of Multiple-Choice Fields
When setting properties with multiple choices such as checkboxes, radio buttons, and dropdown lists within a HubSpot form, it has become possible to flexibly edit the display name and display order of each choice. The display name can be easily changed by clicking the pencil icon in the field options, and unnecessary choices can be deleted with the trash can icon. Furthermore, since the order of choices can be intuitively adjusted by dragging and dropping, you can design a form that is easy for users to understand.
Automatic Information Acquisition via Hidden Fields
A hidden field is a special field that can be set so that it is not visible to form visitors. This is mainly utilized for the purpose of automatically entering default values or automatically collecting and saving specific information without the user being aware of it. For example, by setting UTM parameters (information for tracking the access route to a website) as hidden fields, that information is automatically linked to the corresponding HubSpot property at the time of form submission. This makes it possible to analyze in detail which marketing campaigns and channels contributed to lead acquisition and assist in the optimization of marketing strategies.
How to Create a Form in HubSpot: Detailed Procedure
To effectively create a form that leads to results in HubSpot, it is important to take systematic steps from the planning stage to actual creation work and operation after publication. First, create a form suited to the purpose and customize necessary items and design. After that, publish it by embedding the created form into a site and start operation. For more detailed creation methods and official guides, please see the HubSpot support page.
Strategic Formulation in Advance: Clarification of Goals and Obtained Data
Before constructing a form in HubSpot, strategic preparation is essential first. Clarify the goal of what you want to achieve through the form, and carefully consider specifically what kind of information should be collected and on which page of the website that form should be placed. By clarifying these elements in advance, the form creation process will proceed smoothly, high-quality data can be obtained efficiently, and subsequent data analysis and utilization will become more effective.
Detailed Procedure Guide for Form Creation
Once preparations in advance are completed, create a form according to the following procedure. Here, we will explain the specific creation process using a general "inquiry form" as an example.
- After logging into HubSpot, select "Marketing" from the side menu on the left and click "Forms" to launch the form editor.
- Click the "Create form" button displayed in the upper right of the screen.
- Choose the format of the form to be created. This time, select "Embedded form" and click "Next" to proceed.
- Select a template that fits the purpose. This time, choose "Blank template" and click "Start" in the upper right to begin creation.
- Properties, which are question items, are set either by "Selecting from existing properties" or "Creating new." For example, set properties such as name, company name, email address, and inquiry content.
- When using existing properties: Select necessary items from the property list on the left and place them in the form preview area on the right by dragging and dropping.
- When creating a property newly: From the form field choices, select the item type you want to install (e.g., single-line text, multi-line text, dropdown, etc.) and similarly place it in the form preview on the right by dragging and dropping. After dragging and dropping, set "Object type," "Group," and "Label" in the new property creation column displayed on the right. In the case of new creation, the label (question name) can be set freely.
- Once all necessary question items are set, next, select the field of the "question you want to make a mandatory item" and switch the "Required" option to "ON." By this, users will not be able to send the form unless they enter mandatory items without omission.
- In the "Help text" column, enter auxiliary explanatory text so that users can answer smoothly (e.g., xxx@gmail.com). This text is displayed under the question item and reduces the burden on the user at the time of input.
- If necessary, enter the company's logo and the title of the form to strengthen the form's brand image and give a sense of trust to the user.
- Check the created form in the preview, and after performing adjustments as necessary, "Save" and click "Publish."
The above are the specific steps for creating a HubSpot form.
Tips: Reason why setting an email address in the form is strongly recommendedIn HubSpot form creation, setting the email address item is not mandatory, but its installation is strongly recommended. This is because it is indispensable for realizing more efficient contact management and advanced marketing automation through linkage with HubSpot's powerful CRM function.
Prevention of contact data duplication and ensuring uniquenessIn HubSpot, the uniqueness of contact data is strictly managed using the email address as a starting point. In other words, contacts with the same email address will not be created redundantly. By providing an email address input column in the form, it is possible to automatically check for duplication with existing contacts based on the email address obtained at the time of form submission and maintain data consistency.
Merging of contactsIf the email address collected through a HubSpot form matches an existing contact, HubSpot automatically integrates that contact information. This makes centralized management of contact data easy. If an email field is not set in a HubSpot form, this convenient automatic merge function cannot be used.
Utilization of first-party cookiesHubSpot manages contact information using first-party cookies and tracks the behavior history of website visitors. By performing the setting of an email address in a HubSpot form, these first-party cookies can be associated with contact information at the time of form submission. This makes it possible to grasp the behavior of individual contacts on the web in more detail.
Realization of marketing automationIn order to fully utilize HubSpot's marketing automation function, the contact's email address is indispensable. By incorporating an email field into a HubSpot form, it becomes possible to effectively start personalized marketing automation workflows starting from the email address collected at the time of form submission.
Explanation of Logic for Showing/Hiding Fields of HubSpot Forms
HubSpot forms are equipped with logic to dynamically switch fields displayed according to the user's response content. By this function, only the questions most appropriate for the situation are displayed to the respondent, the complexity of the form is reduced, and it contributes greatly to the improvement of the final completion rate.
Basics of Conditional Logic
HubSpot forms are equipped with a function to display or hide another related input item based on the content of one input item. This is called "conditional logic." By utilizing this logic, the content of the form can be flexibly changed according to the user's response to provide a more personalized experience. As a result, by omitting unnecessary questions and simplifying the input process, the form's bounce rate can be lowered, and an improvement in the final conversion rate can be expected.
Procedure for Setting Conditional Logic
To set conditional logic, proceed with the following steps:
- Within the form editor, select a specific field that serves as the criterion for the condition.
- Click the "Logic" tab in the setting screen of the selected field.
- Press the "Add logic" button and define display conditions or non-display conditions.
- Specify the field for which you want to control display/non-display when the set conditions are met.
- As necessary, more complex logic can be constructed by combining multiple conditions.
This conditional logic can be applied to a wide range of field types such as checkboxes, dropdown menus, and radio buttons. Note that to use this advanced function in HubSpot forms, a "Professional" or "Enterprise" subscription of "Marketing Hub" or "Content Hub" is required. Up to 100 logic rules can be set for each form, and each rule can consist of up to 10 conditions. Furthermore, as a beta version function, it is also possible to set a redirect to a specific payment page based on the response content.
Utilization Cases of Conditional Logic
Conditional logic can be effectively utilized in diverse business scenarios. Here, we introduce some typical usage examples:
- Example 1: Display of additional questions according to the selected product. For example, when having "products of interest" selected from a dropdown list in an inquiry form, relevant additional question fields can be dynamically displayed according to that selection content. Settings such as displaying "Specific purpose of use of Product A" for users who chose "Product A," and "Estimated budget for Product B" for users who chose "Product B" are possible.
- Realization of personalized field display. Input fields of a form can be flexibly switched between display and non-display according to the visitor's attributes (e.g., company size, industry, job type). For example, it is possible to provide an input experience optimized for the target, such as presenting the item of "annual budget" to large-scale companies and "implementation consideration period" to small and medium-sized enterprises.
- Efficient management of complex logic rules. Set conditional logic rules can be intuitively managed within the HubSpot form editor. In addition to newly adding rules, editing existing rules, and deleting unnecessary rules, the priority order can be easily adjusted if multiple conditions exist. This allows for smooth construction of complex conditional branching required for forms and continued optimization through operation.
Settings to Maximize User Experience After Form Submission
Behavior after a form is sent is extremely important for user satisfaction and the next action. In HubSpot, you can choose the most appropriate one from the following three options:
- Guidance to a specific thank-you page
- Redirect to an external website
- Display of a thank-you message directly under the form
Furthermore, if you are using the Enterprise plan, it is also possible to display a reservation form directly after form submission is completed. Based on the visitor's past response history, logic to conditionally redirect to a specific page such as a HubSpot page, external URL, meeting reservation link, or payment link can be set, realizing more advanced personalization.
Sophisticated Editing of Form Content and Utilization of Multi-step Forms
By using HubSpot's form editor, it is possible to customize the form's content, entire structure, and functions in detail. Particularly, in the latest form editor, the creation of multi-step forms is supported, and by collecting complex information in stages, user input burden is reduced, contributing greatly to the improvement of engagement and completion rate.
Overview of Form Content
In the editing interface of HubSpot forms, set input items and actions after submission can be managed comprehensively. By this function, the structure of the form can be quickly grasped, realizing operation consistent as a whole.
Utilization and Setting of Multi-step Forms
In the latest HubSpot form editor, multi-step forms that enhance user engagement can be introduced. This format divides a traditional long form into multiple stages, and by reducing the amount of information presented at one time, it reduces the burden on the user and consequently contributes to a significant improvement in the form completion rate. This advanced function is available to subscribers of Marketing Hub, Sales Hub, Service Hub's Starter, Professional, Enterprise plans, or Content Hub Enterprise.In multi-step HubSpot forms, progress bar display settings and designs can be flexibly customized. A visual progress bar where users can grasp the current input status at a glance directly leads to a decrease in the bounce rate and an improvement in the completion rate. This effective progress display function can be utilized with Starter, Professional, or Enterprise subscriptions of Marketing Hub. Furthermore, in HubSpot forms, it is possible to make form designs more sophisticated and match the brand image through the layout switching function, which allows for selection from various preset step layouts, and individual settings of background banners. This allows for providing a visually appealing, user-friendly form experience.
Notes When Having Customers Themselves Enter HubSpot Forms on the Same Terminal
In scenarios such as exhibitions and in-store events where multiple customers share one device (tablet or PC) to enter a HubSpot form, there are several points to keep in mind. Above all, it is essential to grasp the mechanism of HubSpot's contact data management in advance.
Merging of Contacts via Cookies
The HubSpot system attempts to merge (combine) with existing contacts using first-party cookies set at the time of information submission from a HubSpot form. Therefore, if different users send forms multiple times from the same device, HubSpot may integrate all of these inputs as a single contact based on cookie information. As a result, data for individual prospective customers is not recorded independently, inviting the possibility that the accuracy of valuable customer information will be impaired.
Importance of the "Always create contact for new email" Option
In order to solve the challenge of data management in HubSpot forms, enabling the "Always create contact for new email" option is indispensable. By applying this setting, even if it is a submission from the same device, if a different email address is entered, it will be accurately recorded as an individual new contact without overwriting existing contacts. This makes it possible to reliably capture unique information for each prospective customer or customer and enables more personalized approaches and effective follow-ups.
Simple Steps to Enable the Option
The procedure to enable this important option is as follows. Setting is completed with a few clicks:
- Log into your HubSpot account and open the form editor.
- Choose the specific HubSpot form you want to apply the setting to.
- Click the "Options" tab at the top of the screen.
- Find the item "Always create contact for new email" and check the checkbox next to it.
- Click "Save form" to finalize the change.
By enabling this function, especially in situations such as exhibitions and event venues where multiple participants send forms from one tablet or PC, it becomes possible to reliably identify and manage each sender as an individual contact, and the accuracy of data collection improves dramatically.
Visual Appeal and Effect of HubSpot Forms
The design of HubSpot forms does not stop at a mere matter of appearance; it has a direct impact on user engagement and the final conversion rate. Attractive and intuitively operable forms stimulate the visitor's desire to input, and by encouraging smooth information provision, they become easier to lead to contracts as a result. Note that HubSpot forms have relatively simple design customizability, and there are certain restrictions on style settings (adjustment of layout and visual elements, etc.). If you want to easily create forms with higher design quality, tools like formrun are also options.
Maximize Utilization of Abundant Design Templates
The HubSpot platform provides a large number of pre-professionally designed templates to meet diverse needs. By wisely utilizing these templates, even users without design expertise can construct sophisticated forms instantly. By selecting the optimal template according to the purpose of the form and brand image, you can significantly reduce the time and effort spent on design, publish high-quality forms quickly, and accelerate marketing activities.
Setting as a Raw HTML Form
In the past, when seeking advanced design flexibility in HubSpot forms, the option "Set as a raw HTML form" was effective. By utilizing this function, HubSpot's standard CSS could be invalidated, and it became possible to write the form's HTML and CSS completely freely, making restrictions in design almost non-existent. However, this function was limited to customers using Professional or Enterprise plans of Marketing Hub or CMS Hub. Nevertheless, in the current updated form editor, this "Set as raw HTML" function cannot be used. Please keep in mind that this option remains applicable only to HubSpot forms created using the legacy form editor.
Detailed Settings of Form Styles
In HubSpot's form editor, functions to customize elements such as text, input fields, buttons, and backgrounds in the form and each form step very finely are enriched. This makes it possible to construct HubSpot forms that completely match your company's entire website brand image and design guidelines. Style options applied in the "Global Style Settings" tab are applied consistently to all form steps being created. This function is extremely effective in easily maintaining visual unity among multiple HubSpot forms. However, since individual form step styles cannot be set independently, attention is required on this point. Furthermore, by setting a brand kit in advance, your company's unique designated design can be automatically applied to all new forms. This makes it possible to significantly streamline the form creation and operation process while maintaining design consistency.
Changing Button Position in New Forms
As a long-awaited function, due to the update in early May 2025, it has become possible to change form button positions even in HubSpot's new form editor. Button position adjustment can be easily selected from a dedicated option within the form style settings. By utilizing this function, it can be expected to place buttons in the optimal position for the overall layout and user flow of the form and dramatically improve the convenience for visitors. One point to note is that the button placement selected here is applied uniformly to all steps within that HubSpot form, whether it is a single-step layout or a multi-step layout.
How to Utilize HubSpot Form Automation Functions
By maximizing the automation functions provided by HubSpot forms, it is possible to seamlessly automate processes after form submission and dramatically improve daily operational efficiency. This automation will accelerate the lead nurturing process, realize rapid responses to customer inquiries, and as a result, will be able to significantly increase the return on investment (ROI) of marketing activities as a whole.
Overview of Automation Functions
HubSpot's form automation function is a powerful tool where you can set a series of actions that automatically start when a form is sent. This function can be easily set from the "Automation" tab within the form editor. Actions that can be set with the automation function are diverse, and for example, the following can be listed:
- Sending of emails
- Updating of customer properties
- Starting of workflows
- Sending notifications to Slack
By combining these actions, it becomes possible to comprehensively automate the processing process after form submission. With simple automation settings, basic tasks such as follow-up emails to contacts and automatic sending of internal notification emails to other HubSpot users can be streamlined. However, to utilize more advanced workflows such as delivering step emails according to the content after form submission and automatic creation of new deals, a contract plan of Professional edition or higher is required.
Automatic Sending of Emails
If you use the automation function, you can automatically deliver emails immediately after a form is sent. Specifically, it is possible to automatically send inquiry completion confirmation emails to form senders or thank-you emails for resource downloads. Email templates can be freely created in HubSpot's email editor, contributing to effectively deepening engagement with customers with personalized content.
Automatic Update of Contact Properties
Information obtained at the time of form submission can be automatically reflected in the contact's properties. For example, it is possible to set a custom property such as "inquiry details" and automatically update its value based on content entered from a form. This makes it possible to always keep customer data in the CRM up to date and realize higher precision segmentation and target selection.
Automatic Execution of Workflows
Using form submission as a trigger, HubSpot's powerful workflow function can be started automatically. For example, a series of processes such as automatically adding a contact who sent a form to a specific list, executing lead scoring, and even automatically assigning tasks to sales representatives can be automated. This function makes it possible to execute actions suited to the lead's current state without delay and significantly streamline the entire lead nurturing process.
Automatic Notification to Slack
Using HubSpot form submission as a trigger, notification can be linked to a Slack channel automatically. This allows sales teams and customer support departments to grasp the occurrence of inquiries and new leads in real time. It realizes rapid customer response, improves customer satisfaction, and prevents missing business opportunities.
Automatic Action Settings After Form Submission: Detailed Procedure
After the creation of the form is completed, subsequent automatic actions are set as necessary. These settings automate various processes after form submission and promote operational efficiency and smooth operation.
- Open the "Automation" tab within the form editor.
- Select either "Default simple workflow" or "Create your own simple workflow." In this report, as an example of a simple workflow, click "Create this workflow" to proceed.
- Since the trigger for contact registration is automatically set as "When a contact sends a form," no operation is required in this item.
- As a workflow after form submission, "Send email" is set by default. If a different or additional workflow is required, use the "+" button to incorporate necessary actions such as updating contact properties, adding to a specific list, and internal notification to the person in charge.
- Once the workflow configuration is complete, click the "Update" button in the upper right of the screen to finalize the settings.
- Perform a test submission with the actual form and confirm whether the constructed workflow functions as intended.
- If a deficiency is found by any chance, make corrections and click the "Update" button again to publish the changes.
Through these steps, a series of automations such as follow-up after form submission, data update, and notification can be reliably performed.
Customization of Form Settings
In HubSpot forms, a wide range of setting items such as the contact processing method after submission, notification settings for users, and the form's initial language can be flexibly adjusted. By appropriately managing these settings, an efficient lead management system is constructed, and smooth system operation is realized.
Contact Processing and Management of Lifecycle Stages
When a form is sent, you can specify how the relevant contact is handled within the HubSpot CRM. Specifically, there are options such as "Creation of a new contact" and "Setting as a marketing contact." Furthermore, by using the "Update contact and company lifecycle stage on submission" function, it is possible to automatically advance form senders to a specific lifecycle stage (e.g., Lead, MQL, etc.). However, please keep in mind that a lifecycle stage once advanced will not be returned to a previous stage.
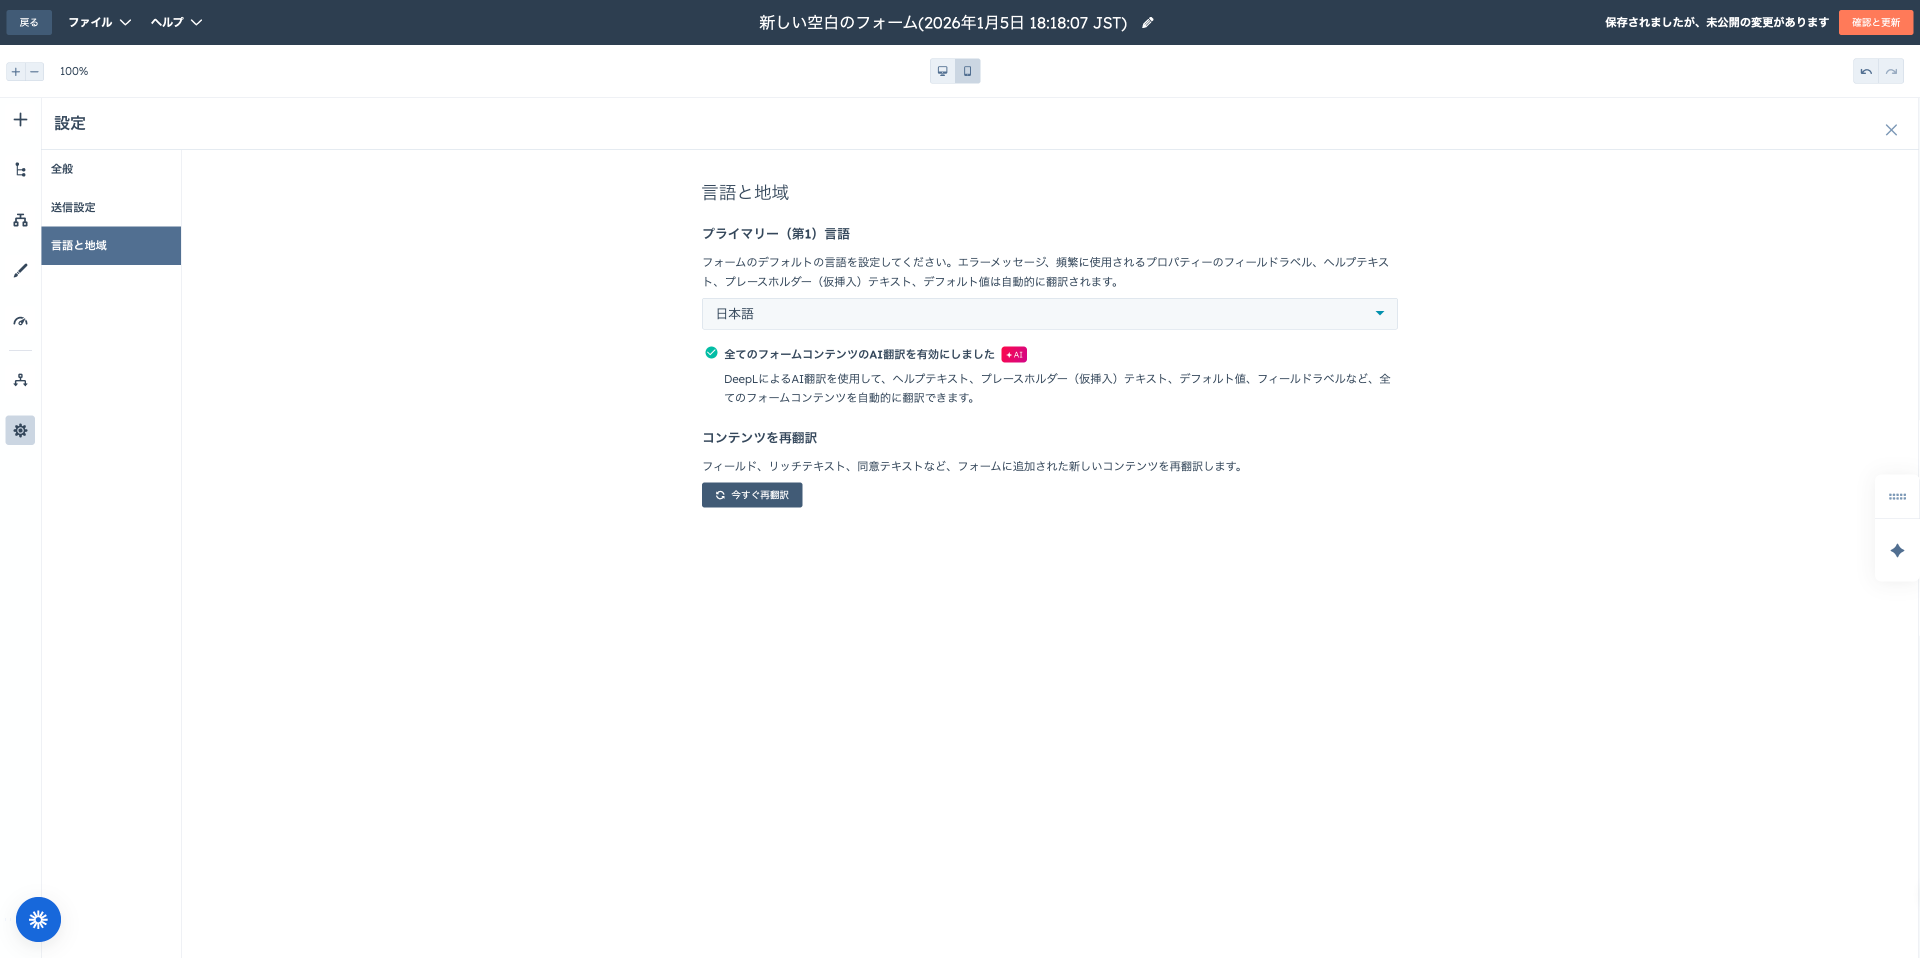
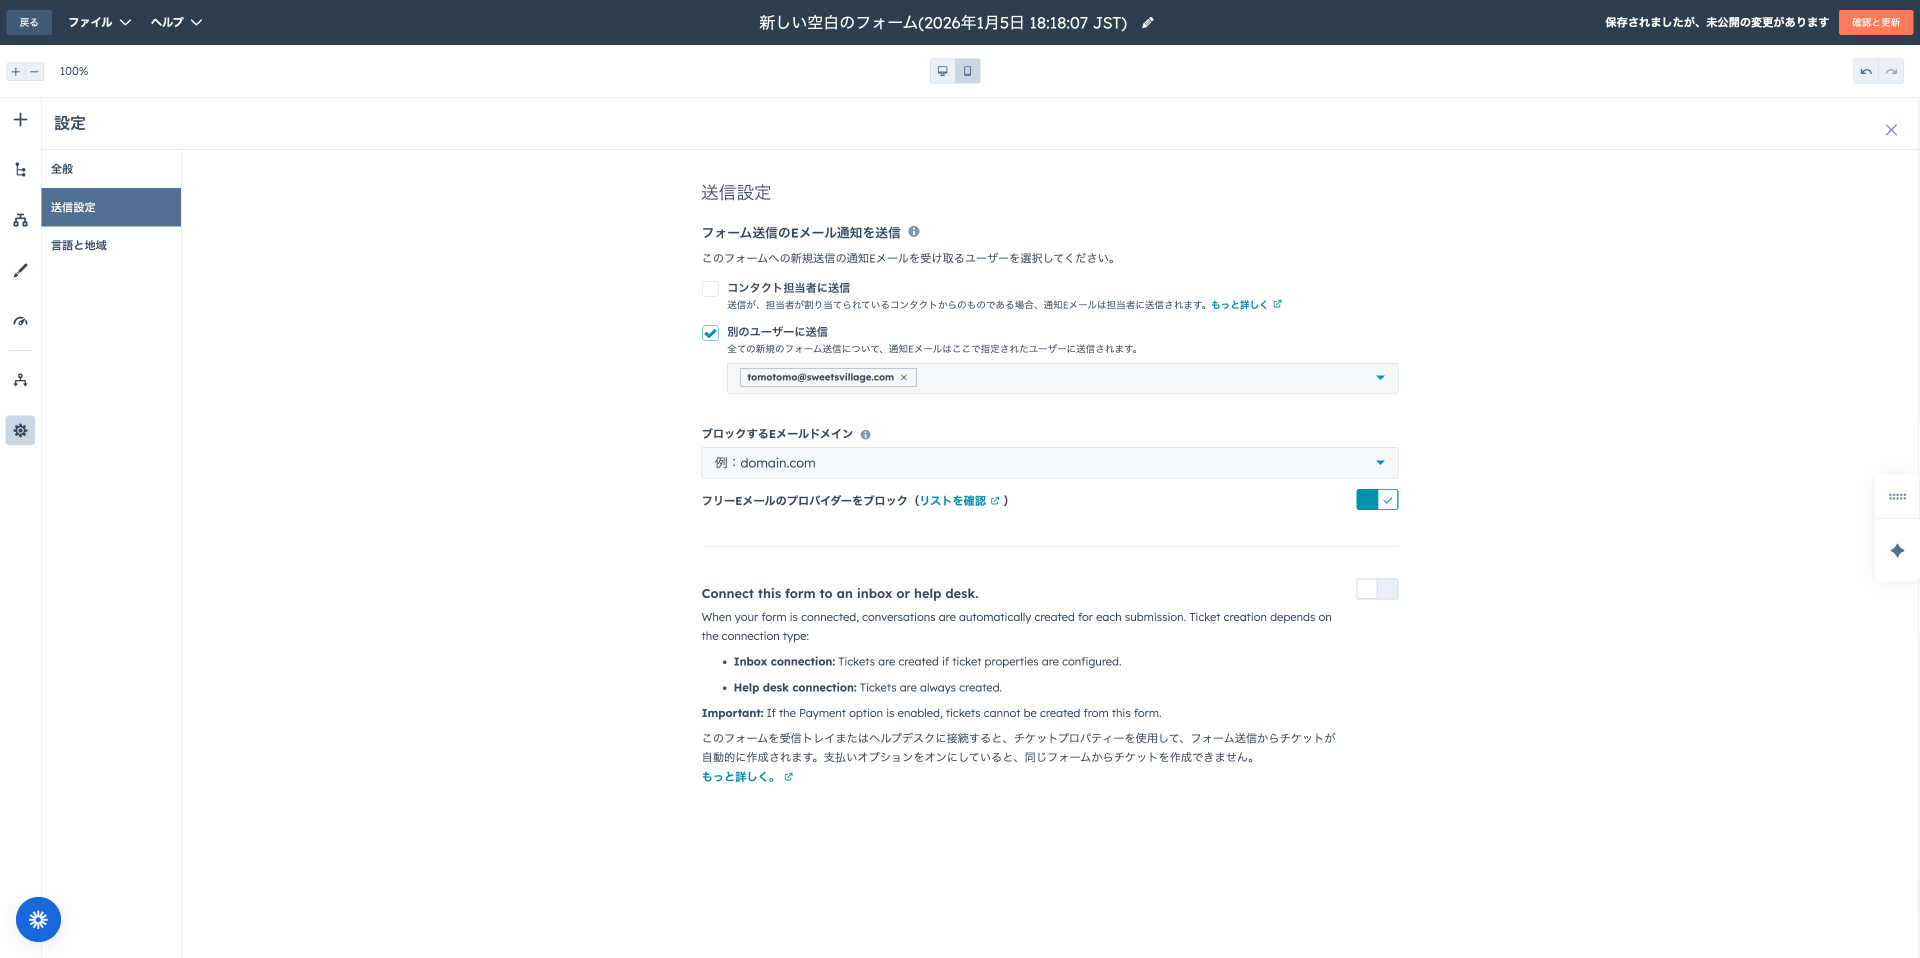
Notification Settings and Language Settings
A function to send automatic notifications to specific users or teams when a HubSpot form is sent is available. Notification recipients and the setting of the default language used by the form can be performed freely. HubSpot standard notifications are concise, but if you want to customize email notifications in more detail or include additional information, you can realize even more flexible notification settings by utilizing the "Send internal email notification" action within the workflow.
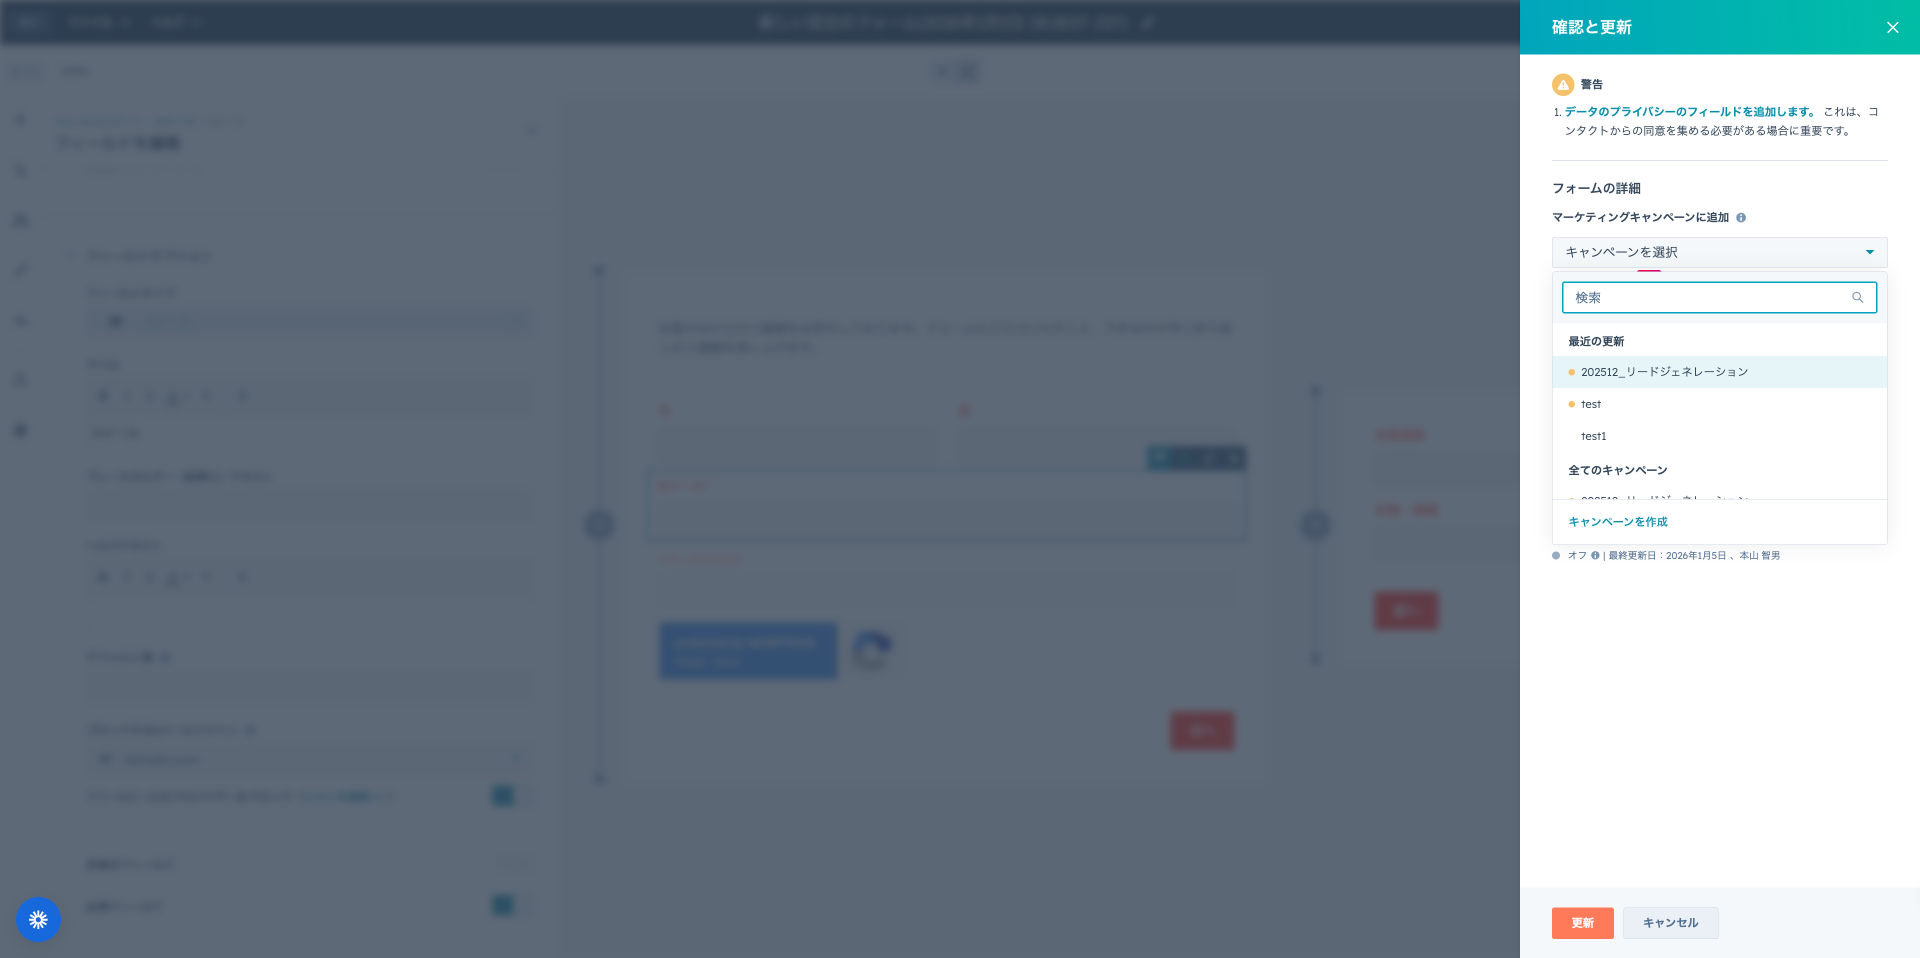
Linkage with Marketing Campaigns
If you have a subscription of Marketing Hub Professional or higher, the "Add to marketing campaign" function can be used. By linking a form to a specific campaign, it becomes possible to accurately track the number of new contacts acquired (or influenced) by that campaign. This strengthens campaign effect measurement and return on investment (ROI) analysis, contributing greatly to the optimization of marketing strategies. Note that in the new version of forms, this linkage needs to be set through a workflow.
Block Settings for Email Sending Domains
As a spam countermeasure for forms, settings to block submissions from specific email domains are provided. For example, if you want to refuse submissions from a domain like "undesired.com," you only need to add that domain to the block list. Furthermore, to prevent malicious submissions beforehand, by enabling the "Block free email providers" option, it is possible to collectively restrict form submissions from general free email services such as Gmail and Yahoo! Mail.
Immediate Validation of Form Fields
The real-time validation function of form fields can also be set and managed. By this function, errors in input content can be detected on the spot while the user is entering information, and correction can be urged. For example, by displaying a warning when the email address format is incorrect or mandatory items are not entered, it contributes to improving the quality of collected data and providing a smoother input experience for the user.
Plan-based Comparison of HubSpot Form Functions
The functions provided by HubSpot forms vary greatly depending on the subscription plan you are using. Choosing a plan that matches your company's business strategy is the key to drawing out its maximum effect.
- Free Plan: Ideal for initial lead acquisition activities, basic form creation and data linkage to CRM are possible. This allows you to build a foundation for managing prospective customer information as HubSpot contacts.
- Starter Plan: In addition to the core functions of the Free plan, relaxation of form creation number limits and function expansion are planned. For example, addition and editing of a progress bar that visually shows the form's input process is available in plans of Marketing Hub Starter or higher.
- Professional and Enterprise Plans: In addition to all functions of the Free and Starter plans, functions to realize more advanced customization and automation are unlocked. This includes dependent fields (conditional logic) that switch field display depending on conditions, smart fields based on user data, unique email validation settings, and display control tailored to the target audience (however, direct editing of raw HTML in the new editor is excluded). Also, construction of complex workflows and multi-step forms consisting of multiple steps becomes possible in Professional plans or higher.
As such, as you migrate to higher plans, the flexibility of form design, the breadth of automation, and the scope of utilizing obtained data expand, supporting the execution of more sophisticated marketing measures.
Publication of Forms and Diverse Sharing Options
When publishing and sharing a HubSpot form, if you are embedding a HubSpot form into an external site, it is necessary to install HubSpot's tracking code in advance. After the form's design and settings are completed, the next step is sharing work to publish the created form on the web and have prospective customers access it. In HubSpot, forms can be effectively deployed in various methods.
Importance of Publication and Update Processes
When you have created a form newly or made changes to an existing form, in order to reflect those setting contents, it is necessary to publish by clicking the "Review and update" button in the upper right of the form editor. Please note that if you neglect this final step, changes will not be applied on the website.
Available Form Sharing Methods
After putting a form in a published state, it can be distributed and shared by any of the methods shown below:
- Integration into HubSpot Host Pages: On web pages and landing pages constructed on the HubSpot platform, forms can be inserted directly through the HubSpot form module. This allows HubSpot's content management system and forms to link seamlessly.
- Embedding into External Sites: When you want to install a form on a website or blog operated outside of HubSpot, the form is displayed simply by pasting the embed code (HTML snippet) generated by HubSpot into the HTML source of the target page.
- Sharing as a Standalone Page: It is also possible to share the form itself as an independent web page through a unique URL (shared link) automatically generated by HubSpot. This URL can be utilized in a wide range of applications such as email campaigns, social media posts, and advertising link destinations.
By making full use of these flexible sharing options, it is possible to efficiently collect lead information through diverse online channels and accelerate marketing activities.
Summary
HubSpot forms exceed mere data collection tools and are powerful solutions for optimizing marketing activities and maximizing high-quality lead acquisition. As introduced in this article, through a wide variety of form types, intuitive creation processes, advanced customization options, and seamless integration and automation functions with CRM, you can strengthen contact points with customers and realize efficient lead information collection. Clear goal setting for forms and consideration for the target audience lead to ingenuity in design and question content, and as a result, contribute to the improvement of form submission completion rates. For companies that want to link with websites and landing pages to accelerate lead generation through HubSpot forms, their utilization is extremely effective.
FAQ
- Can HubSpot forms be used even on the Free plan? Yes, major functions of HubSpot forms can be utilized even on the Free plan. Functions that form the basis of lead acquisition, such as form creation functions, data linkage to CRM, and management of contact information, can be started for free. However, more advanced custom settings, conditional branching logic, multi-step forms, and detailed automation workflows are available only on paid plans (Starter, Professional, Enterprise).
- What types of HubSpot forms are there? HubSpot forms have various types prepared to promote conversion on websites. Major ones include "survey forms" for obtaining customer opinions and feedback, "inquiry forms" for handling general inquiries and support requests, "purchase forms" accompanying payment information, and "multi-step forms" that prevent user bounce and increase completion rates by having information entered in stages.
- What is form conditional logic? Also, on which plan is it available? Form conditional logic is a function to switch between display and non-display of specific input fields or guide to a different next page according to the visitor's response content. This allows only questions more relevant to the user to be displayed, reducing stress in form input and providing the optimal experience. This function is available with a Professional or Enterprise subscription of Marketing Hub or Content Hub.
- What can be done with the automation function after HubSpot form submission? After a HubSpot form is sent, a wide range of actions can be executed automatically to optimize business processes. Specifically, it is possible to automatically send thank-you emails or next-step guidance emails to senders, automatically update customer information in CRM to the latest state, or perform automatic distribution to specific segments. Furthermore, HubSpot forms efficiently streamline everything from lead nurturing to customer engagement and significantly reduce the burden of manual work, such as immediate notifications to the sales team, alert sending to tools like Slack, or the triggering of complex automation workflows.
- Is it possible to create multi-step forms with HubSpot forms? Yes, it is possible to construct multi-step HubSpot forms in HubSpot. This function was released as a beta version in August 2024, and by dividing a long form into multiple short steps, it reduces the psychological burden on users and consequently contributes greatly to the improvement of the form completion rate. To use this innovative HubSpot form function, a subscription to one of Marketing Hub, Sales Hub, Service Hub's Starter, Professional, Enterprise plans, or Content Hub Enterprise is required.
- How is data collected by HubSpot forms managed? Data entered through HubSpot forms is automatically and seamlessly synchronized and saved in the HubSpot CRM. This automatic linkage saves the trouble of manual data entry, and while information consistency is maintained, it becomes possible to manage all lead data centrally. Within the CRM, collected information is organized as properties for each contact, and furthermore, subsequent behavior on the website, email opening status, click history, etc., are also linked, allowing for the construction of detailed and multifaceted profiles for each customer.
- Are there any notes when multiple people send HubSpot forms on the same terminal? When multiple users send HubSpot forms from the same device (PC, tablet, etc.), there is a risk that all submission data will be integrated into a single contact information due to browser cookie information used by HubSpot. To avoid this potential problem and perform accurate data management, it is recommended to enable the option "Always create contact for new email" in the HubSpot form setting screen. By applying this setting, if a different email address is entered, it will be accurately recorded as an individual contact even if it is a submission from the same device.